


I love making doughnuts (well, pastries in general) but sometimes I want a good bite but I'm just so lazy to bake. Well, I could just look for a site that sells but it's usually not homemade. I love homemade doughnuts because the creativity is just endless. Think of various toppings that you could have. I especially love yeast-raised doughnut with strawberry filling topped with vanilla frosting and poppin’ sprinkles and also chocolate cake doughnut with chocolate frosting and coconut flakes, yummy.
As a developer, I thought to myself why don't I just cook up something that allows people to sell and buy homemade doughnuts. It would also have a bot that takes your order and can automatically match you with someone that sells close by, so I don't have to worry about my doughnuts coming late. I could just go and pick them up or have the seller deliver them to me, either way, depends on my mood.
So, let's dig in.
The app has three different sections
- The API and database (fast-api, Python, MongoDB, and Vercel)
- The App itself (built with Java)
- The chatbot for ordering doughnuts(Pytorch)
Here I'll discuss how to build the API and connect the database.
What exactly does the app do?
- Shows you a list of yummy doughnuts, their categories
- Gives you a description of a doughnut you selected
- Allows you to order the quantities available
- Chat with a bot that well, does the above statements
So, what's an API?
From Wikipedia, An application programming interface (API) is a computing interface that defines interactions between multiple software intermediaries. It defines the kinds of calls or requests that can be made, how to make them, the data formats that should be used, the conventions to follow, etc. Simply, an API is an interface that allows you to connect your database with various devices like websites, android/ios apps, and software applications. Multiple devices access one database using an API. The API is like an intermediary between the database and the devices. It makes it easier rather than managing multiple databases for different devices, you can just use an API to make them all connected. You can read more here.
FastAPI is a modern, fast (high-performance), web framework for building APIs with Python 3.6+ based on standard Python type hints. Simply, fast-api allows you to deploy your APIs really fast with fewer bugs, shorter codes and it's easy to setup.
Vercel Vercel is a cloud platform for static sites and Serverless Functions that fits perfectly with your workflow. It enables developers to host websites and web services that deploy instantly, scale automatically, and requires no supervision, all with no configuration. Plus, they allow you to host for free as an individual, forever.
MongoDB Atlas MongoDB is a general-purpose distributed database for storing documents on the cloud. According to stackshare, MongoDB Atlas is a global cloud database service built and run by the team behind MongoDB. You enjoy the flexibility and scalability of a document database, with the ease and automation of a fully managed service on your preferred cloud. MongoDB Atlas can be classified as MongoDB Hosting. MongoDB Atlas is one of the supported databases by Vercel and it's easy to set up too.
This API was built on Windows OS so, some of the tips and solutions to errors are specific to Windows users (sorry Mac and Linux). I won't be going through the whole step of building an API from scratch because someone already did a better job. This read shows how to build the API and also set up with MongoDB. I will show how you can deploy the API on Vercel.
Many Windows users (like myself) face a lot of bugs even when following a tutorial step-by-step. Either you have the issue of a missing directory in your PATH , or you need to downgrade your dependencies, or install some software to enable you to use some packages, or some other issues. It could be frustrating sometimes, but not to worry I discussed some of the errors I faced and how I resolved them.
Before even starting out, you should have Python 3.6 or higher installed on your system. Vercel specifically supports version 3.6 while fast-api supports 3.6 or higher..)
It's advisable to create a new virtual environment so as not to have conflicting packages and ruin your perfectly working existing environment. You can learn more here
If you tried using pip or pip3 to install any dependency and got this error,
bash: pip3: command not foundUsepy pip install ...orpython pip install ...It's good you use git bash, but you could also use any other command-line interface you are comfortable with. Download git here
If you get this error when you want to create a virtual environment after installing it,
bash: virtualenv: command not foundtrypy -m virtualenv the_name_of_your_virtual_envAfter installing MongoDB, if you get this error when trying to start MongoDB,
bash: mongo: command not found. You can either start it manually by double-clicking on the mongo.exe file here"C:\Program Files\MongoDB\Server\4.4\bin\"Or, you can open it from your command prompt"C:\Program Files\MongoDB\Server\4.4\bin\mongo.exe"After installing python-decouple, you also need to do
pip install pymongo[srv]if you get this error when running the application:
Traceback (most recent call last):
  File "C:\Users\Bunmi\AppData\Local\Programs\Python\Python37\lib\multiprocessing\process.py", line 297, in _bootstrap
    self.run()
  File "C:\Users\Bunmi\AppData\Local\Programs\Python\Python37\lib\multiprocessing\process.py", line 99, in run
    self._target(*self._args, **self._kwargs)
  File "C:\Users\Bunmi\newvenv\lib\site-packages\uvicorn\subprocess.py", line 62, in subprocess_started
    target(sockets=sockets)
  File "C:\Users\Bunmi\newvenv\lib\site-packages\uvicorn\main.py", line 390, in run
    loop.run_until_complete(self.serve(sockets=sockets))
  File "C:\Users\Bunmi\AppData\Local\Programs\Python\Python37\lib\asyncio\base_events.py", line 587, in run_until_complete
    return future.result()
  File "C:\Users\Bunmi\newvenv\lib\site-packages\uvicorn\main.py", line 397, in serve
    config.load()
  File "C:\Users\Bunmi\newvenv\lib\site-packages\uvicorn\config.py", line 278, in load
    self.loaded_app = import_from_string(self.app)
  File "C:\Users\Bunmi\newvenv\lib\site-packages\uvicorn\importer.py", line 20, in import_from_string
    module = importlib.import_module(module_str)
  File "C:\Users\Bunmi\AppData\Local\Programs\Python\Python37\lib\importlib\__init__.py", line 127, in import_module
    return _bootstrap._gcd_import(name[level:], package, level)
  File "<frozen importlib._bootstrap>", line 1006, in _gcd_import
  File "<frozen importlib._bootstrap>", line 983, in _find_and_load
  File "<frozen importlib._bootstrap>", line 967, in _find_and_load_unlocked
  File "<frozen importlib._bootstrap>", line 677, in _load_unlocked
  File "<frozen importlib._bootstrap_external>", line 728, in exec_module
  File "<frozen importlib._bootstrap>", line 219, in _call_with_frames_removed
  File "C:\Users\Bunmi\fastapi-mongodb-donut\app\server\app.py", line 2, in <module>
    from server.routes.donut import router as DonutRouter
  File "C:\Users\Bunmi\fastapi-mongodb-donut\app\server\routes\donut.py", line 4, in <module>
    from server.database import (
  File "C:\Users\Bunmi\fastapi-mongodb-donut\app\server\database.py", line 7, in <module>
    client = motor.motor_asyncio.AsyncIOMotorClient(MONGO_DETAILS)
  File "C:\Users\Bunmi\newvenv\lib\site-packages\motor\core.py", line 156, in __init__
    delegate = self.__delegate_class__(*args, **kwargs)
  File "C:\Users\Bunmi\newvenv\lib\site-packages\pymongo\mongo_client.py", line 641, in __init__
    connect_timeout=timeout)
  File "C:\Users\Bunmi\newvenv\lib\site-packages\pymongo\uri_parser.py", line 428, in parse_uri
    raise ConfigurationError('The "dnspython" module must be '
pymongo.errors.ConfigurationError: The "dnspython" module must be installed to use mongodb+srv:// URIs
Now, to deploy on Vercel. You need to have the following packages installed
- npm. You can follow this tutorial
- yarn. Node.js must be first installed before you install yarn. You can install it directly using npm. Follow the documentation
Vercel.
- Create an account here .
- Install Vercel using yarn in your command prompt.
yarn global add vercel
Now, log in from the command prompt. You will be asked to provide your email.
vercel login
Add a vercel.json file to your root directory. Copy this code
  "builds": [
    {"src": "/server/app.py", "use": "@now/python"}
  ],
  "routes": [
    {"src": "/(.*)", "dest": "server/app.py"}
  ]
}
Using @now/python is depreciated in the newer versions of Vercel, so you can also use @vercel/python.
The vercel.json file indicates the path to the application's entry point and also the file to be used when building our app in the routes object.
Your directory should now look like this.
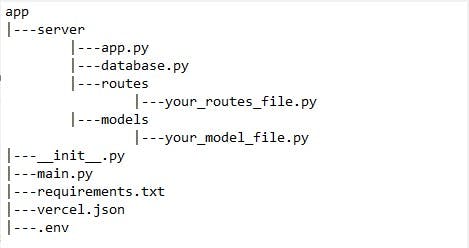
I added pymongo[srv] because python-decouple can't run without installing it (if you had to install it earlier).
Make sure your requirements.txt, vercel.json, and .env file is in your app folder(root directory).
Now, in your terminal type,
verecl .
You could also use
vercel devto run and test your codes on localhost before deploying to production. It also allows for live reloading, so you don't have to do Control + C to kill the process.
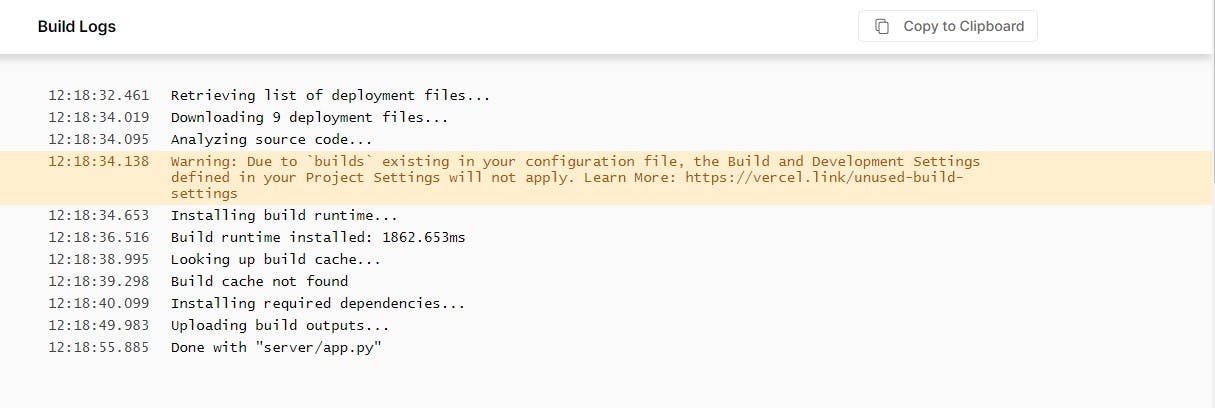
Follow the prompt. You would get two links, one to inspect your API and the other as a production link where anyone can access your API. Your build logs should look like this;
You have successfully deployed your API. This is the link to my api
When you open the Inspect link, you should see something similar to this,

If you got a 502 error, check your function logs here.
You can either go to the Inspect link given to you and click on the function tab to see your logs, or you can do it from your command line. If your Inspect link is
"vercel.com/bumie-e/api-app/icqvij7er", then do:
vercel logs api-icqvij7er.vercel.app
Replace icqvij7er with yours.
If you are having an issue with Vercel installing your packages then, you either misspelled your requirements.txt file or you saved it as requirements.TXT instead of requirements.txt. I also faced this issue too. It could also be that you didn't add all the necessary requirements. Better still, check your function logs to be sure especially if you had no errors while building.
Let's build our chatbot! Yay!
We want our chatbot to be able to
- take orders
- show the available doughnuts
- tell the available categories
I'll be using PyTorch for this chatbot build. You need to have it installed first. In your python environment, do
pip install torch
So first, let's create our data. Our data contains three main parts
- Patterns: are the likely words a user will say
- Response: is what our bot's reply
- Tag: this defines the context of the word. Could be greeting, appreciation, etc.
This tutorial was followed for building this chatbot. The original codes can be found here. No major modification was made.
We'll be using an NLP(Natural Language Processing) library called nltk, for processing the text and making it ready for the model.
pip install nltk
Let me explain some terms I'll be using in these codes
- Stemming: it is the process of reducing a word to its word stem that affixes to suffixes and prefixes or to the roots of words known as a lemma. Eg Starting- start, drinking - drink, etc.
- Tokenization: it is splitting a phrase, sentence, paragraph, or an entire text document into smaller units, such as individual words or terms. It's just splitting a text into its individual words/tokens which could be punctuation marks too.
- Bag of words: BoW for short, is a way of extracting features from the text for use in modeling, such as with machine learning algorithms.
Now, let's create a new file called nltk_utils.py. This file will contain
- a tokenizer
- a stemmer
- a bag of words model
The way the bags of word model works is that it compares a given sentence to a text. It searches for where each word in the sentence can be found in the text and replaces it with 1.
An example,
sentence = ["hello", "how", "are", "you"] words = ["hi", "hello", "I", "you", "bye", "thank", "cool"] BoW = [ 0 , 1 , 0 , 1 , 0 , 0 , 0]
Create a new file and name it models.py. We want to define our PyTorch model. The model will have three linear layers with a ReLU and no activation and no softmax at the end because we are already going to use CrossEntropy and we also want our output as words.
Lastly, we need to train this model, so create a new file called train.py. In this file, we are going to
- Import our model and functions created in nltk_utils
- loop through our data to create tags, doc(containing each pattern and respective tag), and also all the words we have in the data.
- Stem, remove duplicates, remove punctuation and convert to lower case our tags and all words
- Create a training file by looping and converting all words to the bag of words and target by getting the index of each tag.
- Convert them to NumPy arrays
- Create a class for loading the data and load it using Pytorch's DatLoader.
- Load the model
- Move the data to either CPU or cuda and get the predictions
- Display the loss for every 100 steps and the final loss at the end of the epoch
- Save the model
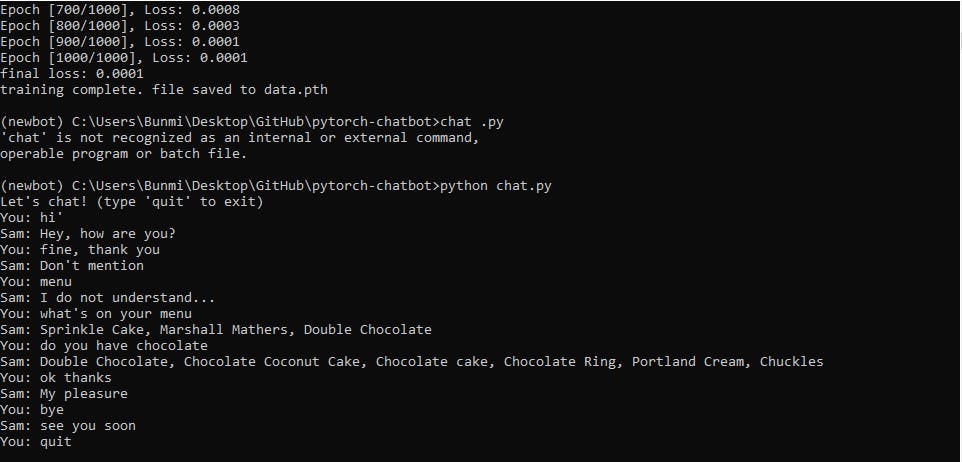
To run it,
- open your terminal
- activate the environment you installed PyTorch to
- type python train.py
To test it out, create a new file named chat.py. Here, we are going to
- reload the model
- the intents file and the saved variables.
We will also create a process that
- takes the word
- perform the preprocessing
- get the predictions.
Now, we ought to deploy this model on Vercel too, but Vercel has a limit of 50MB for file size and the whole file size is about 723MB. So, it can't work and I haven't figured out a way around it yet. An alternative is to host our model using the localhost. To do this, change the API request endpoint to your computer's local IP address and run the app on your device (if you are using a mobile device). If you are using an emulator, you can check here for more information.
To host the model locally, create a new file and name it modelapi.py. Now, this would be similar to the chat.py file you created already only with some minor changes of including
- a route to a dummy page
- a route to get the predictions
Our API is up and running! The model successfully built. Now, let's build our app! Phew, at least we get to see how it works!
To get started,
- You want to get Android Studio installed first before you continue. You can also follow this guide to set it up.
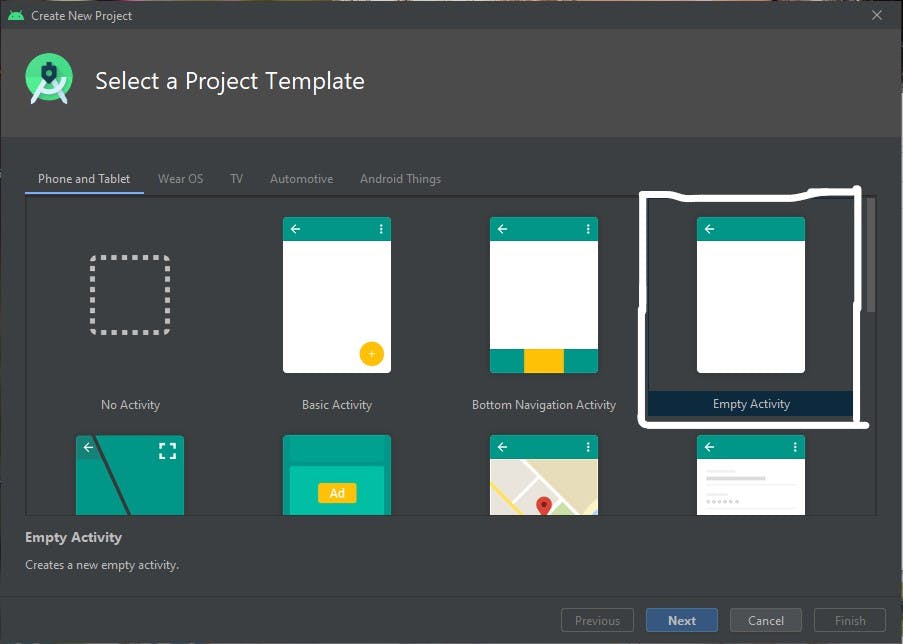
- Create a new project in Android Studio.
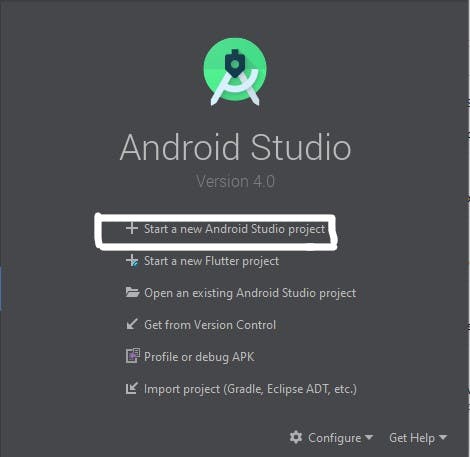
- Create an empty activity and name the project your wish. I'll name mine Dounix.
- After the gradle is done building, open MainActivity.java if it's not automatically opened.
We need to load the data from the API into different sections.
- Special doughnuts for the data
- Enlarged view of a random doughnut
- All other doughnuts on the menu.
Before we can make any request, add these to the build.gradle file (app-level). We need this Retrofit Libary to make POST and GET requests to the API
    implementation 'com.squareup.retrofit2:converter-gson:2.1.0'
    implementation 'com.squareup.retrofit2:retrofit:2.1.0'
Before we can think of making any requests, we need to first create an interface between our app and the rest API. So, we are going to create an interface called JsonPlaceholderApi.java. Right-click on MainActivity.java, choose new and select Java file. Select Interface not class. Inside the JsonPlaceholderApi.java, write
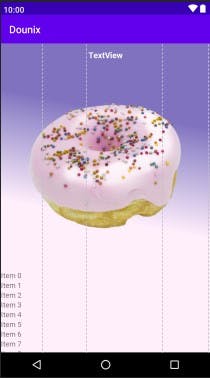
Now, let's create all the UI's of the app. We will create
- the activity_main UI which will display all items
- view items UI which will display each item selected
- chat interface for the bot and customer
I already created some UI elements using Lunacy (like Sketch for windows) to give a beautiful and doughnut sale shop appearance.
We'll need 4 different activities
- Main Activity where all the data will be displayed primarily
- Item Activity for viewing the selected item in details
- Chat Activity for creating a chat interface with the chatbot
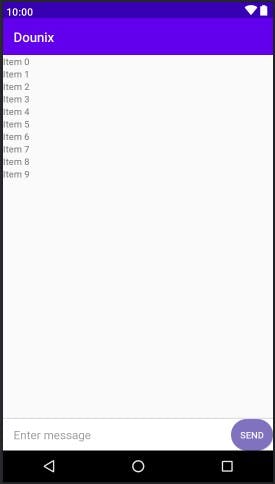
- Upload Data Activity for writing data to our database The activity_main.xml will look like this. It contains a Floating Action Button to allow us to easily navigate to the chat
 We will also need an XML file that will give us the desired look of each element in the recycler view. Let's call it view_menu_item.xml
Now, the activity_item.xml will look like this.
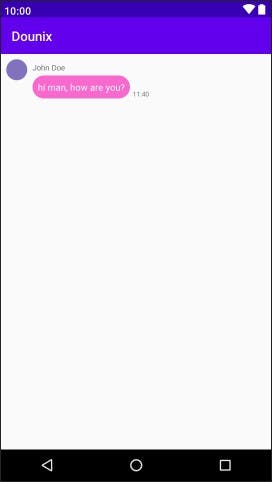
For the chat interface, we need to create two extra UI's, one for the customer's message and the other to display the bot message. The bot.xml will look like this
The me.xml (customer) will look like this
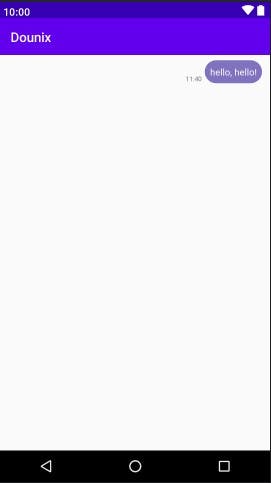
The activity_chat will look like this
Now, we need to create an Adapter and Model class for the recycler views present in the actvity_main.xml file, which will allow us to display the information retrieved from the API. Model.java class,
Recyclerview Adapter.java class,
In our MainActivity.java file, we are going to create two methods,
- one to retrieve all doughnuts
- one to get special doughnuts for the day
So, we need to
- cast all our views first
- create the methods for retrieving the data
- create a new ArrayList
- populate the contents of the new ArrayList with the items retrieved
- create an instance of the adapter class
- set the recycler view to the adapter
In the Items.java file, we will create three methods
- for increasing order quantity
- for reducing order quantity
- for retrieving the details of the selected item
Items.java file should look like this,
Now, for our Chat.java file, we need to create an Adapter class and a model class for our recycler view. This will be quite different from the ones you might be used to (if you've built one before). How? We are going to create methods that position the text depending on the person sending the message. Right for the user and left for the bot. The model class will contain just the message of the user and the type of sender (whether bot or customer).
Message_model.java file should look like this,
Custom Adapter for the Chat.java file should look like this,
The Chat.java file contains a method sendMessage that
- sets the customer's message to the recycler view
- sends the message to the API
- displays the bot's reply
The Chat.java file should look like this
Now, we still need to add data to our database right? it's quite empty. So, create a new Activity and name it Upload. All we are doing here is to make a POST request to the specified API endpoint in the JsonPlaceholderApi.java
In the Upload.xml file, we will create views for the image, price, description, category, and name of the doughnut.
Trust me, this is a very long read. It took me almost forever to write. I hope you enjoyed it and I hope that you are also able to reproduce the codes. You can find the codes used for the app here. That's it for now, do share with others. Thank you!
For questions, you could always reach out to me on
- Twitter @bumie_rose.
Thank you for reading and happy building (pretty much debugging too)!